> ## Documentation Index
> Fetch the complete documentation index at: https://speakeasy-20cf8bdf.mintlify.site/llms.txt
> Use this file to discover all available pages before exploring further.
# Quickstart
> Learn how to get started with Dub Conversions
Dub Conversions require a [Business plan](https://d.to/business) subscription
or higher.
[Dub Conversions](https://dub.co/help/article/dub-conversions) is a powerful tool that lets you turn any [short link you create on Dub](https://dub.co/help/article/how-to-create-link) into a full attribution engine. This allows you to understand how well your links are translating to actual users and revenue dollars.
Learn more about [how Dub Conversions works](https://dub.co/help/article/dub-conversions).
 In this guide, we'll walk you through the steps to get started with Dub Conversions:
1. [Enable conversion tracking for your links](#step-1-enable-conversion-tracking-for-your-links)
2. [Install the `@dub/analytics` client-side SDK](#step-2-install-the-dub-analytics-client-side-sdk)
3. [Install the Dub server-side SDK](#step-3-install-the-dub-server-side-sdk)
4. [Start sending events](#step-4-start-sending-events)
5. [View your conversions](#step-5-view-your-conversions)
## Step 1: Enable conversion tracking for your links
First, you'll need to enable conversion tracking for your Dub links to be able to start tracking conversions.
There are a few ways to do this:
1. [On a workspace-level](#option-1-on-a-workspace-level)
2. [On a link-level](#option-2-on-a-link-level)
3. [Via the API](#option-3-via-the-api)
### Option 1: On a workspace-level
To enable conversion tracking for all future links in a workspace, you can do the following:
1. Navigate to your [workspace's Analytics settings page](https://app.dub.co/settings/analytics).
2. Toggle the **Workspace-level Conversion Tracking** switch to enable conversion tracking for the workspace.
In this guide, we'll walk you through the steps to get started with Dub Conversions:
1. [Enable conversion tracking for your links](#step-1-enable-conversion-tracking-for-your-links)
2. [Install the `@dub/analytics` client-side SDK](#step-2-install-the-dub-analytics-client-side-sdk)
3. [Install the Dub server-side SDK](#step-3-install-the-dub-server-side-sdk)
4. [Start sending events](#step-4-start-sending-events)
5. [View your conversions](#step-5-view-your-conversions)
## Step 1: Enable conversion tracking for your links
First, you'll need to enable conversion tracking for your Dub links to be able to start tracking conversions.
There are a few ways to do this:
1. [On a workspace-level](#option-1-on-a-workspace-level)
2. [On a link-level](#option-2-on-a-link-level)
3. [Via the API](#option-3-via-the-api)
### Option 1: On a workspace-level
To enable conversion tracking for all future links in a workspace, you can do the following:
1. Navigate to your [workspace's Analytics settings page](https://app.dub.co/settings/analytics).
2. Toggle the **Workspace-level Conversion Tracking** switch to enable conversion tracking for the workspace.
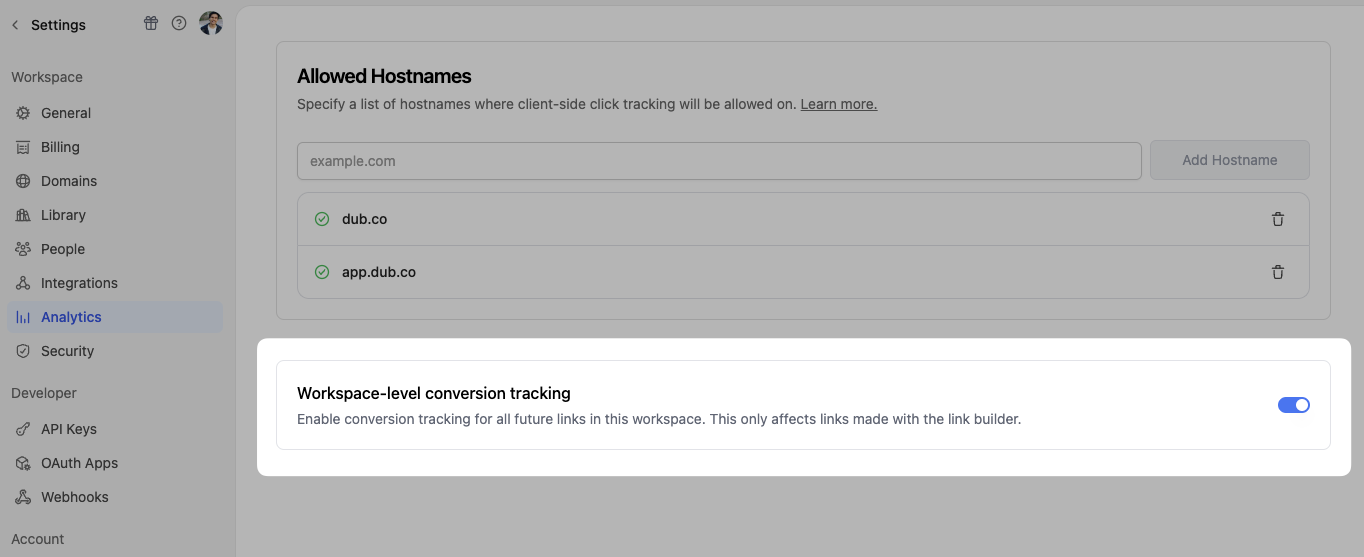 This option will enable conversion tracking in the [Dub Link Builder](https://dub.co/help/article/dub-link-builder) for all future links.
### Option 2: On a link-level
If you don't want to enable conversion tracking for all your links in a workspace, you can also opt to enable it on a link-level.
To enable conversion tracking for a specific link, open the [Dub Link Builder](https://dub.co/help/article/dub-link-builder) for a link and toggle the **Conversion Tracking** switch.
This option will enable conversion tracking in the [Dub Link Builder](https://dub.co/help/article/dub-link-builder) for all future links.
### Option 2: On a link-level
If you don't want to enable conversion tracking for all your links in a workspace, you can also opt to enable it on a link-level.
To enable conversion tracking for a specific link, open the [Dub Link Builder](https://dub.co/help/article/dub-link-builder) for a link and toggle the **Conversion Tracking** switch.
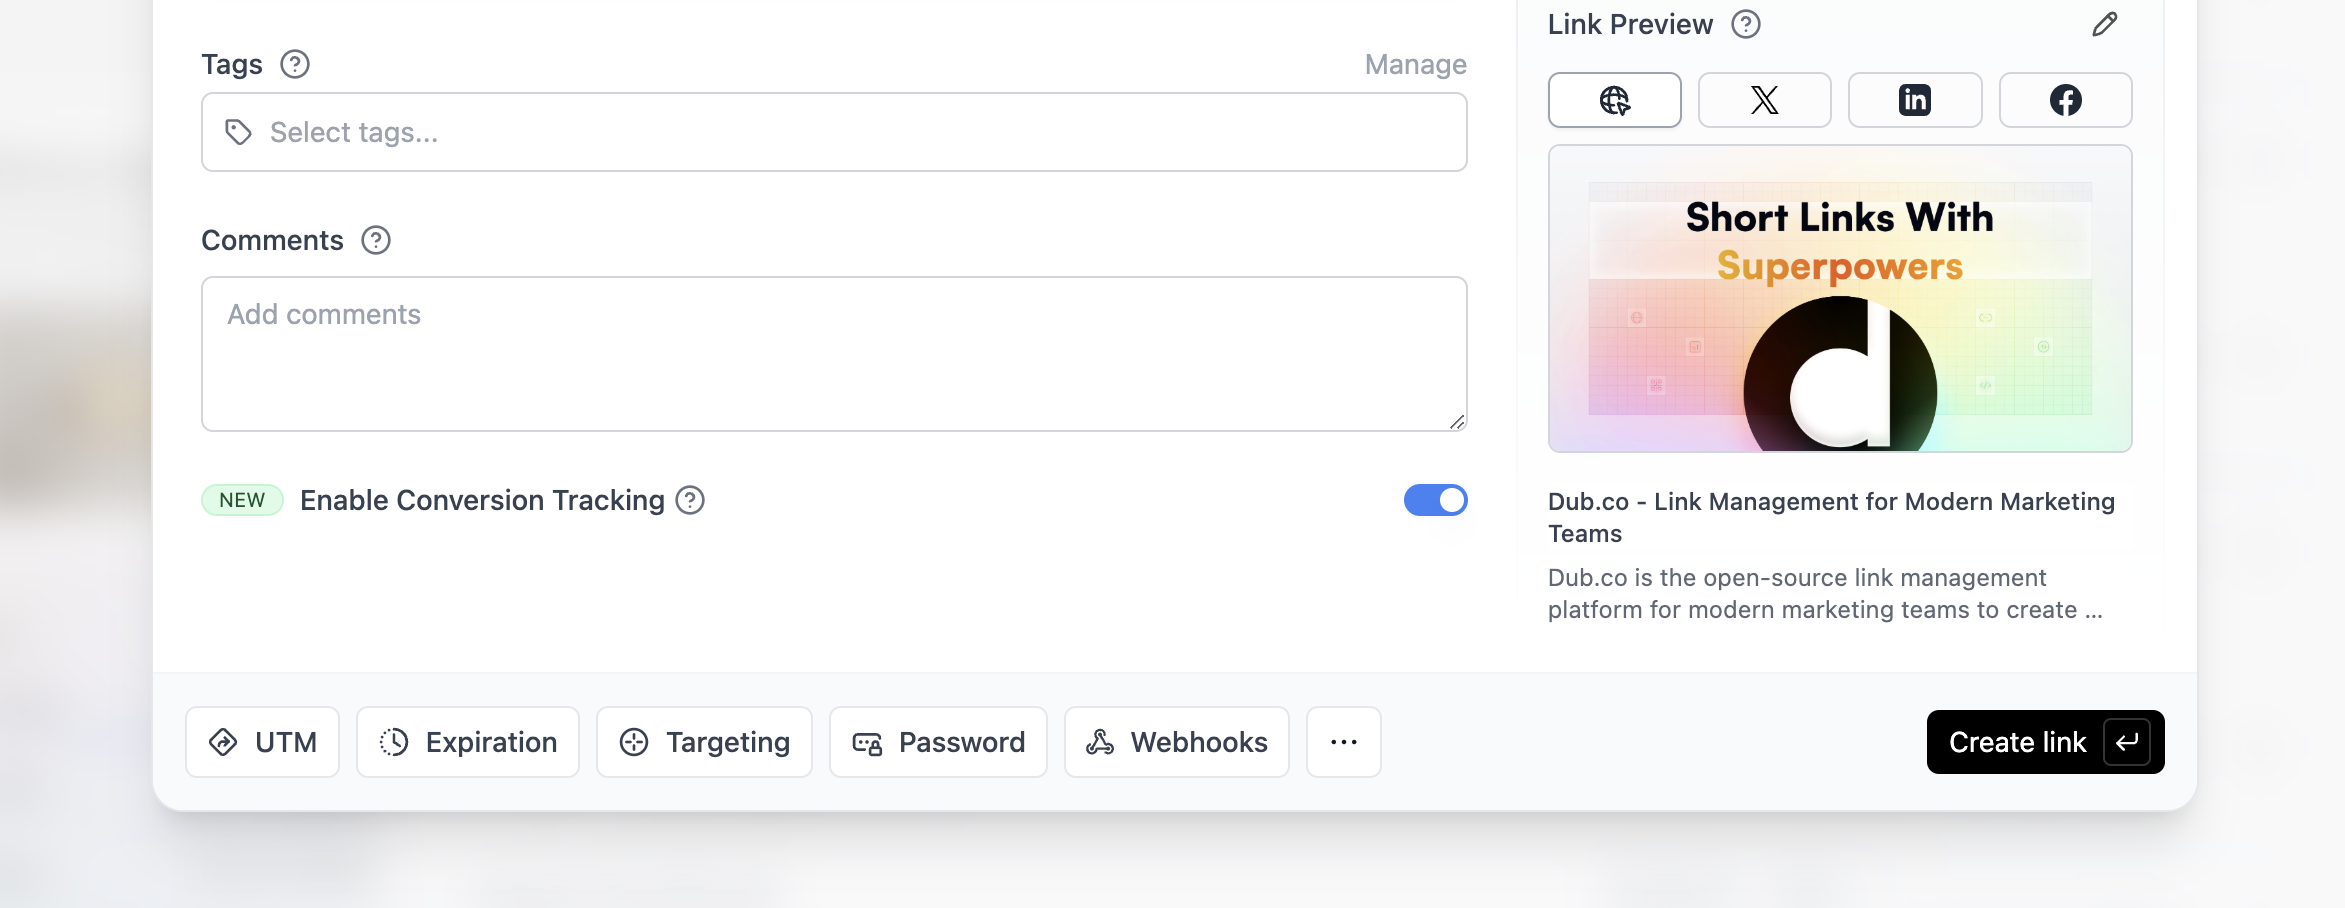 You can also use the `C` keyboard shortcut when inside the link builder to
quickly enable conversion tracking for a given link.
### Option 3: Via the API
Alternatively, you can also enable conversion tracking programmatically via the [Dub API](/api-reference/introduction). All you need to do is pass `trackConversion: true` when creating or updating a link:
```typescript TypeScript theme={null}
const link = await dub.links.create({
url: "https://dub.co",
trackConversion: true,
});
```
```python Python theme={null}
link = d.links.create(url="https://dub.co", track_conversion=True)
```
```go Go theme={null}
link, err := d.Links.Create(ctx, &dub.CreateLinkRequest{
URL: "https://dub.co",
TrackConversion: true,
})
```
```ruby Ruby theme={null}
s.links.create_many(
::OpenApiSDK::Operations::CreateLinkRequest.new(
url: "https://dub.co",
track_conversion: true,
)
)
```
## Step 2: Install the `@dub/analytics` client-side SDK
Next, you'll need to install the [@dub/analytics client-side SDK](/sdks/client-side/introduction).
This will handle the detection of the `dub_id` query parameter and storing it as a first-party cookie, which will be used to attribute subsequent conversion events to the original link.
You can also use the `C` keyboard shortcut when inside the link builder to
quickly enable conversion tracking for a given link.
### Option 3: Via the API
Alternatively, you can also enable conversion tracking programmatically via the [Dub API](/api-reference/introduction). All you need to do is pass `trackConversion: true` when creating or updating a link:
```typescript TypeScript theme={null}
const link = await dub.links.create({
url: "https://dub.co",
trackConversion: true,
});
```
```python Python theme={null}
link = d.links.create(url="https://dub.co", track_conversion=True)
```
```go Go theme={null}
link, err := d.Links.Create(ctx, &dub.CreateLinkRequest{
URL: "https://dub.co",
TrackConversion: true,
})
```
```ruby Ruby theme={null}
s.links.create_many(
::OpenApiSDK::Operations::CreateLinkRequest.new(
url: "https://dub.co",
track_conversion: true,
)
)
```
## Step 2: Install the `@dub/analytics` client-side SDK
Next, you'll need to install the [@dub/analytics client-side SDK](/sdks/client-side/introduction).
This will handle the detection of the `dub_id` query parameter and storing it as a first-party cookie, which will be used to attribute subsequent conversion events to the original link.
 Based on the framework or platform you're using, you can install the script in different ways:
Add Dub Analytics to your React app.
Add Dub Analytics to your website.
}
href="/sdks/client-side/installation-guides/framer"
>
Add Dub Analytics to your Framer site.
Add Dub Analytics to your Shopify store.
Add Dub Analytics to your WordPress site.
Add Dub Analytics to your Webflow site.
## Step 3: Install the Dub server-side SDK
If you are using Shopify, you can skip this step since our Shopify app will
automatically track conversions for you. Read the [Shopify integration
guide](/sdks/client-side/installation-guides/shopify) for more information.
Dub Conversions uses server-side event tracking to track conversions. Depending on which framework you're using, you can use our [native SDKs](/sdks/overview):
TypeScript library for the Dub API
Go library for the Dub API
Python library for the Dub API
Ruby library for the Dub API
If you're using a framework that isn't listed, you can use the Dub REST API to track events on the server-side:
* [Tracking a lead event](/api-reference/endpoint/track-lead)
* [Tracking a sale event](/api-reference/endpoint/track-sale)
## Step 4: Start sending events
If you are using Shopify, you can skip this step since our Shopify app will
automatically track conversions for you. Read the [Shopify integration
guide](/sdks/client-side/installation-guides/shopify) for more information.
Now that you've installed the SDKs, you can start sending events to Dub. Since click events are tracked automatically, you'll only need to send events for the following cases:
* [Lead events](#step-4a-sending-lead-events)
* [Sale events](#step-4b-sending-sale-events)
### Step 4a: Sending Lead Events
The first event you'll want to send is a `lead` event. This happens when a user performs an action that indicates interest in your product or service. This could be anything from:
* Signing up for an account
* Adding a product to cart
* Joining a mailing list
Based on the framework or platform you're using, you can install the script in different ways:
Add Dub Analytics to your React app.
Add Dub Analytics to your website.
}
href="/sdks/client-side/installation-guides/framer"
>
Add Dub Analytics to your Framer site.
Add Dub Analytics to your Shopify store.
Add Dub Analytics to your WordPress site.
Add Dub Analytics to your Webflow site.
## Step 3: Install the Dub server-side SDK
If you are using Shopify, you can skip this step since our Shopify app will
automatically track conversions for you. Read the [Shopify integration
guide](/sdks/client-side/installation-guides/shopify) for more information.
Dub Conversions uses server-side event tracking to track conversions. Depending on which framework you're using, you can use our [native SDKs](/sdks/overview):
TypeScript library for the Dub API
Go library for the Dub API
Python library for the Dub API
Ruby library for the Dub API
If you're using a framework that isn't listed, you can use the Dub REST API to track events on the server-side:
* [Tracking a lead event](/api-reference/endpoint/track-lead)
* [Tracking a sale event](/api-reference/endpoint/track-sale)
## Step 4: Start sending events
If you are using Shopify, you can skip this step since our Shopify app will
automatically track conversions for you. Read the [Shopify integration
guide](/sdks/client-side/installation-guides/shopify) for more information.
Now that you've installed the SDKs, you can start sending events to Dub. Since click events are tracked automatically, you'll only need to send events for the following cases:
* [Lead events](#step-4a-sending-lead-events)
* [Sale events](#step-4b-sending-sale-events)
### Step 4a: Sending Lead Events
The first event you'll want to send is a `lead` event. This happens when a user performs an action that indicates interest in your product or service. This could be anything from:
* Signing up for an account
* Adding a product to cart
* Joining a mailing list
 Our most common lead event is `Sign Up`, which happens when a user signs up for an account. Depending on which authentication framework you're using, here are a few examples of how to send `Sign Up` lead events:
Tracking lead events with NextAuth.js
Tracking lead events with Clerk
Tracking lead events with Supabase
Tracking lead events with Auth0
Tracking lead events with Appwrite
If you're using the [Remix framework](https://remix.run/), you might run into an [issue](https://github.com/remix-run/remix/discussions/7922) where you get an empty/null value for the `dub_id` cookie. In that case, try using a library like [`cookie`](https://github.com/jshttp/cookie) instead:
```typescript theme={null}
import cookie from "cookie";
const cookies = cookie.parse(request.headers.get("cookie") ?? "");
const dubId = cookies.dub_id;
```
Here's the full list of attributes you can pass when sending a lead event:
| Property | Required | Description |
| :--------------- | :------- | :----------------------------------------------------------------------------------------------------------------------- |
| `clickId` | **Yes** | The unique `dub_id` parameter that the lead conversion event is attributed to. |
| `eventName` | **Yes** | The name of the event. Example: "Sign up". |
| `externalId` | **Yes** | The unique ID of the customer in your system. Will be used to identify and attribute all future events to this customer. |
| `customerEmail` | No | The email address of the customer. If not passed, a random email address will be generated. |
| `customerName` | No | The name of the customer. If not passed, a random name will be generated (e.g. "Big Red Caribou"). |
| `customerAvatar` | No | The avatar URL of the customer. If not passed, a random avatar URL will be generated. |
The lead event will serve as the source of truth for the customer's identity and which link they came from. This means that all subsequent actions performed by the customer (e.g. upgrading their plan, purchasing a product) will automatically be attributed to the original link.
### Step 4b: Sending Sale Events
The second event you'll want to send is a `sale` event. This happens when a user purchases your product or service. This could be anything from:
* Subscribing to a paid plan
* Usage expansion (upgrading from one plan to another)
* Purchasing a product
Our most common lead event is `Sign Up`, which happens when a user signs up for an account. Depending on which authentication framework you're using, here are a few examples of how to send `Sign Up` lead events:
Tracking lead events with NextAuth.js
Tracking lead events with Clerk
Tracking lead events with Supabase
Tracking lead events with Auth0
Tracking lead events with Appwrite
If you're using the [Remix framework](https://remix.run/), you might run into an [issue](https://github.com/remix-run/remix/discussions/7922) where you get an empty/null value for the `dub_id` cookie. In that case, try using a library like [`cookie`](https://github.com/jshttp/cookie) instead:
```typescript theme={null}
import cookie from "cookie";
const cookies = cookie.parse(request.headers.get("cookie") ?? "");
const dubId = cookies.dub_id;
```
Here's the full list of attributes you can pass when sending a lead event:
| Property | Required | Description |
| :--------------- | :------- | :----------------------------------------------------------------------------------------------------------------------- |
| `clickId` | **Yes** | The unique `dub_id` parameter that the lead conversion event is attributed to. |
| `eventName` | **Yes** | The name of the event. Example: "Sign up". |
| `externalId` | **Yes** | The unique ID of the customer in your system. Will be used to identify and attribute all future events to this customer. |
| `customerEmail` | No | The email address of the customer. If not passed, a random email address will be generated. |
| `customerName` | No | The name of the customer. If not passed, a random name will be generated (e.g. "Big Red Caribou"). |
| `customerAvatar` | No | The avatar URL of the customer. If not passed, a random avatar URL will be generated. |
The lead event will serve as the source of truth for the customer's identity and which link they came from. This means that all subsequent actions performed by the customer (e.g. upgrading their plan, purchasing a product) will automatically be attributed to the original link.
### Step 4b: Sending Sale Events
The second event you'll want to send is a `sale` event. This happens when a user purchases your product or service. This could be anything from:
* Subscribing to a paid plan
* Usage expansion (upgrading from one plan to another)
* Purchasing a product
 Depending on which payment processor you're using, we offer native integrations for the following:
Tracking sale conversion events with Stripe and the Dub SDK
Tracking sale conversion events with Shopify and the Dub SDK
Alternatively, you can also send sale events manually using [our SDKs](/sdks/overview) or the [`POST /track/sale` API endpoint](/api-reference/endpoint/track-sale).
Here are the properties you can include when sending a sale event:
| Property | Required | Description |
| :----------------- | :------- | :------------------------------------------------------------------------------------------------------------------------------- |
| `externalId` | **Yes** | The unique ID of the customer in your system. Will be used to identify and attribute all future events to this customer. |
| `amount` | **Yes** | The amount of the sale in cents. |
| `paymentProcessor` | **Yes** | The payment processor that processed the sale. (E.g. [Stripe](/conversions/sales/stripe), [Shopify](/conversions/sales/shopify)) |
| `eventName` | No | The name of the event. Defaults to "Purchase". |
| `invoiceId` | No | The invoice ID of the sale. Can be used as a idempotency key – only one sale event can be recorded for a given invoice ID. |
| `currency` | No | The currency of the sale. Defaults to "usd". |
| `metadata` | No | An object containing additional information about the sale. |
## Step 5: View your conversions
Once you've enabled conversion tracking for your links, all your tracked conversions will show up on your [Analytics dashboard](https://app.dub.co/analytics). We provide 3 different views to help you understand your conversions:
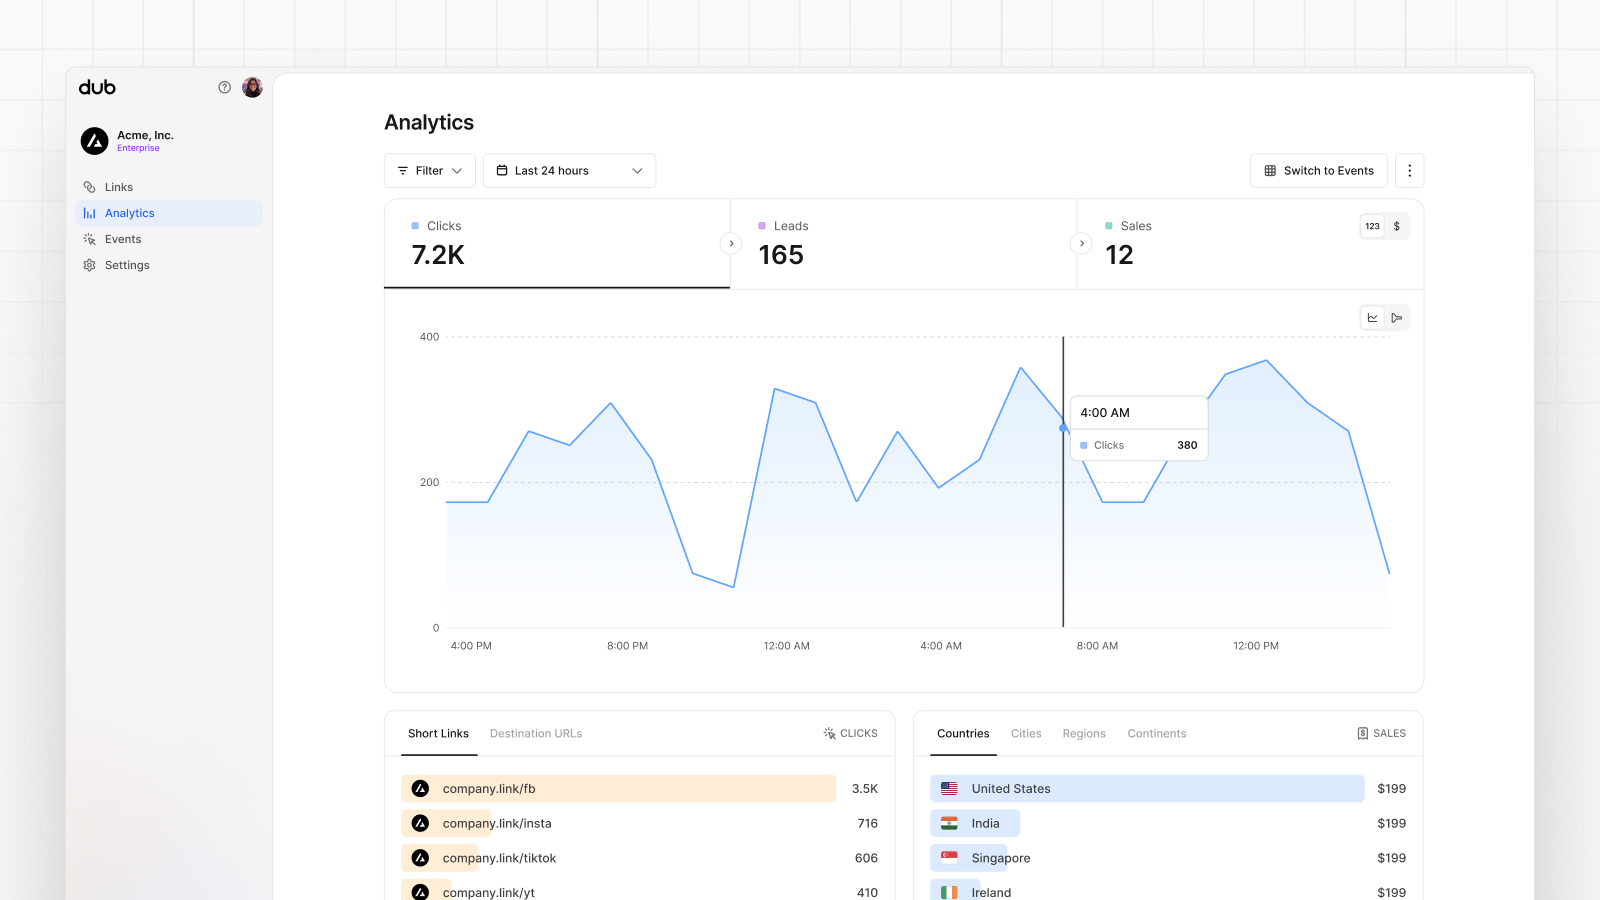
* **Time-series**: A [time-series view](https://dub.co/help/article/dub-analytics#1-time-series-analytics-chart) of the number clicks, leads and sales.
Depending on which payment processor you're using, we offer native integrations for the following:
Tracking sale conversion events with Stripe and the Dub SDK
Tracking sale conversion events with Shopify and the Dub SDK
Alternatively, you can also send sale events manually using [our SDKs](/sdks/overview) or the [`POST /track/sale` API endpoint](/api-reference/endpoint/track-sale).
Here are the properties you can include when sending a sale event:
| Property | Required | Description |
| :----------------- | :------- | :------------------------------------------------------------------------------------------------------------------------------- |
| `externalId` | **Yes** | The unique ID of the customer in your system. Will be used to identify and attribute all future events to this customer. |
| `amount` | **Yes** | The amount of the sale in cents. |
| `paymentProcessor` | **Yes** | The payment processor that processed the sale. (E.g. [Stripe](/conversions/sales/stripe), [Shopify](/conversions/sales/shopify)) |
| `eventName` | No | The name of the event. Defaults to "Purchase". |
| `invoiceId` | No | The invoice ID of the sale. Can be used as a idempotency key – only one sale event can be recorded for a given invoice ID. |
| `currency` | No | The currency of the sale. Defaults to "usd". |
| `metadata` | No | An object containing additional information about the sale. |
## Step 5: View your conversions
Once you've enabled conversion tracking for your links, all your tracked conversions will show up on your [Analytics dashboard](https://app.dub.co/analytics). We provide 3 different views to help you understand your conversions:
* **Time-series**: A [time-series view](https://dub.co/help/article/dub-analytics#1-time-series-analytics-chart) of the number clicks, leads and sales.
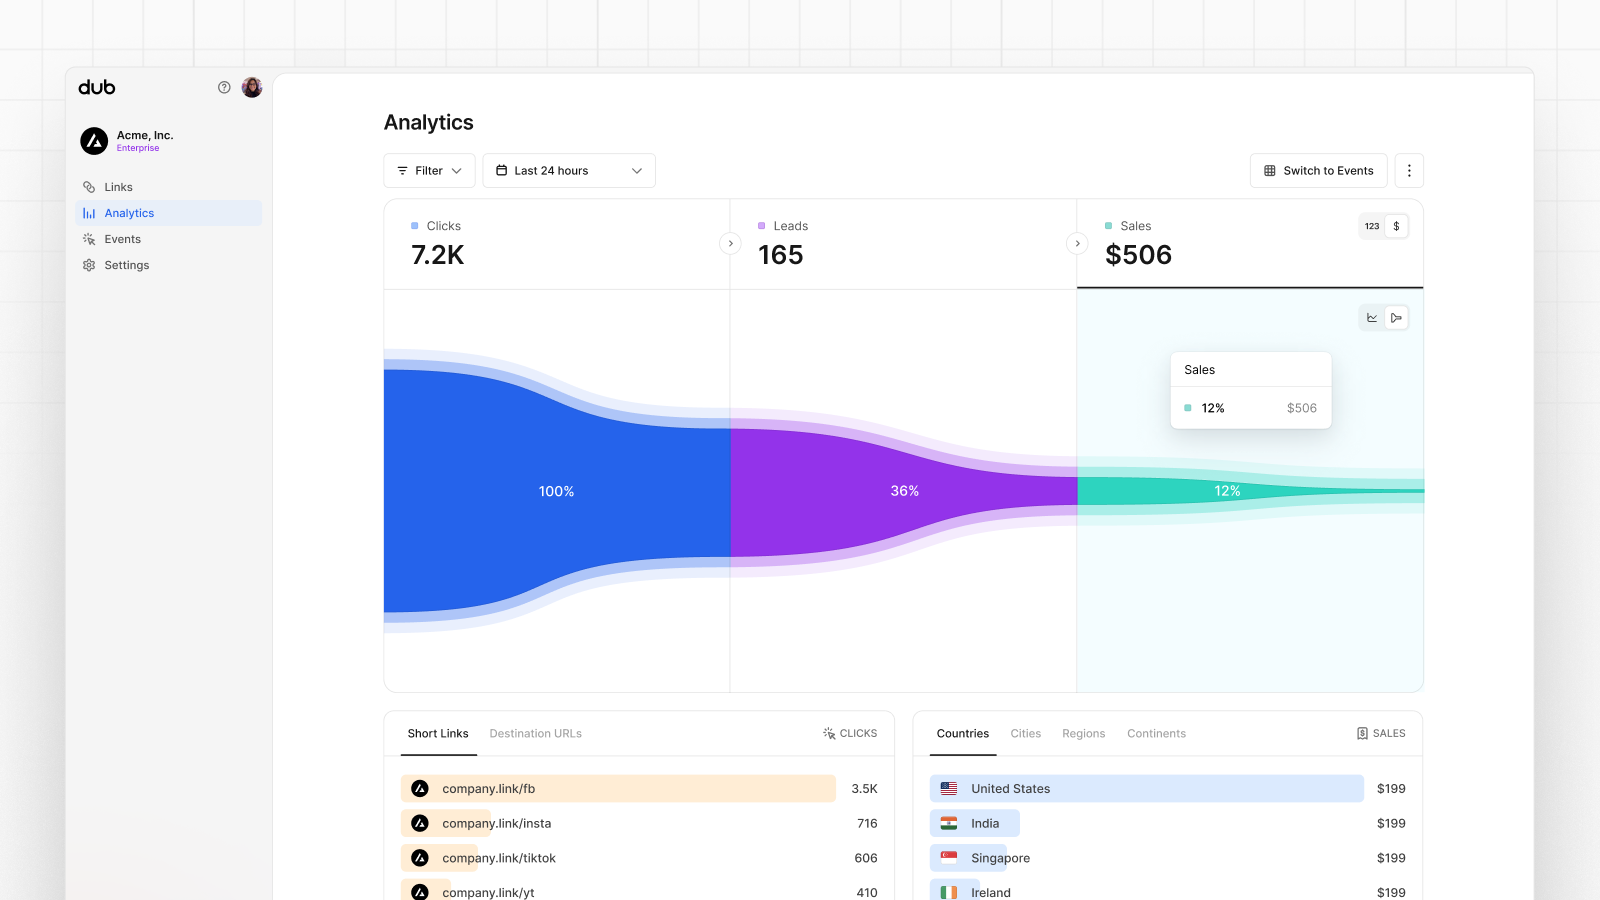
 * **Funnel chart**: A funnel chart view visualizing the conversion & dropoff rates across the different steps in the conversion funnel (clicks → leads → sales).
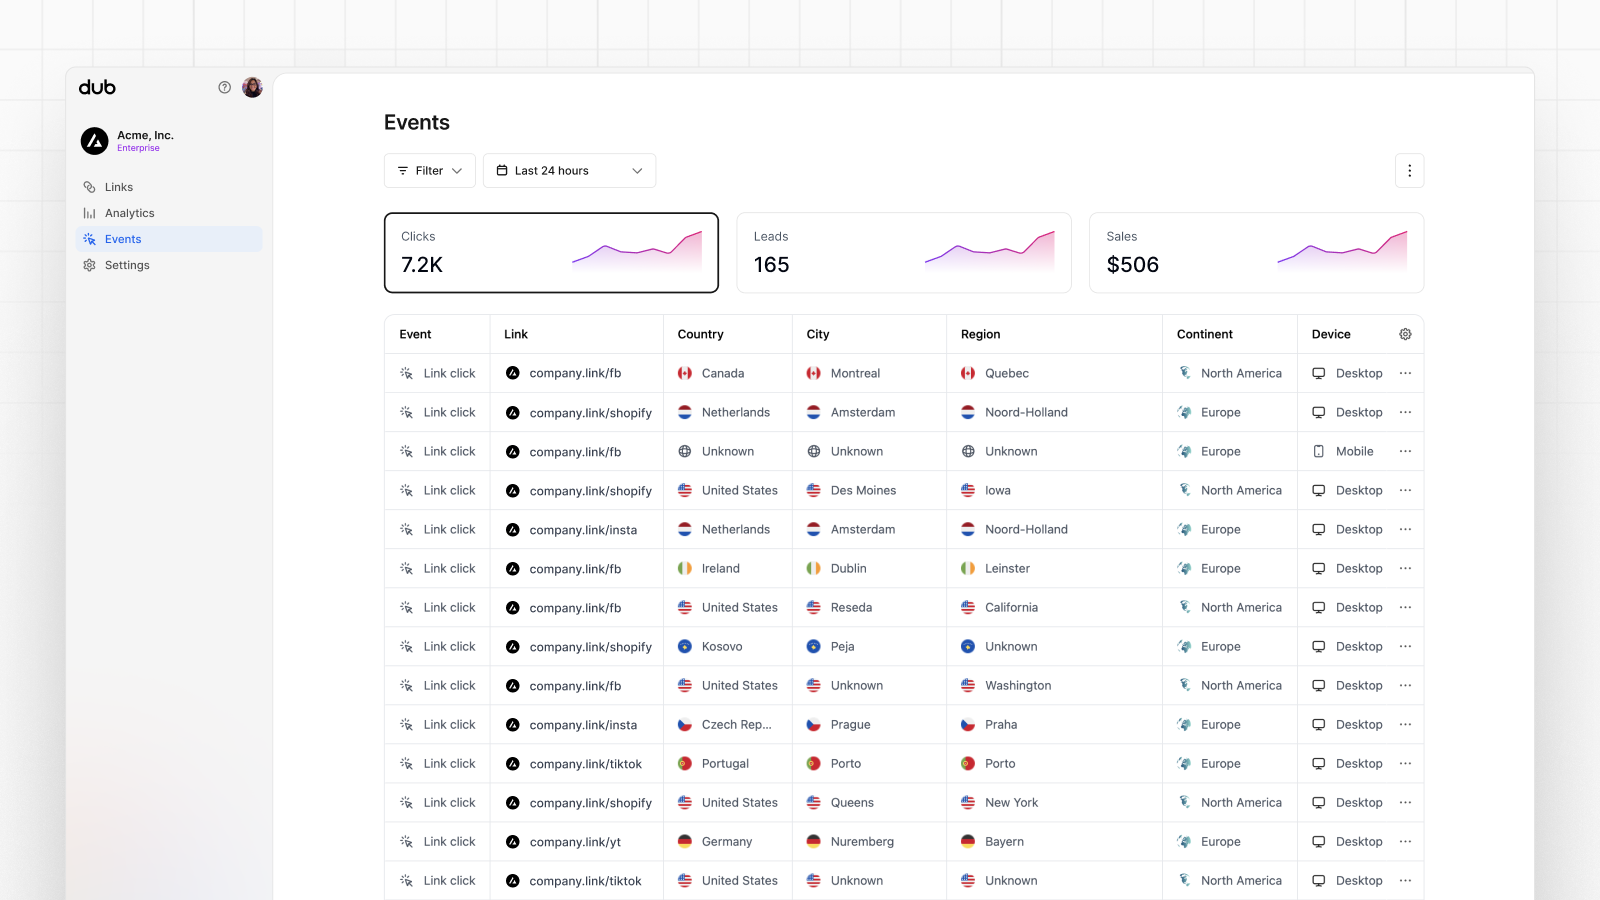
 * **Real-time events stream**: A [real-time events stream](https://dub.co/help/article/real-time-events-stream) of every single conversion event that occurs across all your links in your workspace.
 ## Example Apps
See the full example on GitHub.
## Example Apps
See the full example on GitHub.